Hello and welcome to Sourdough and stories beyond I am your host Mykola Nevrev and I am a sourdough expert, cookbook author and owner of The Midnight bakery, soon to be Bloom bakery in Bratislava, Slovakia In each episode of this podcast, I am going …
Hello and welcome to Sourdough and stories beyond I am your host Mykola Nevrev. In each episode of this podcast, I am going to share a story from the wonderful, and sometimes strange world of sourdough baking and beyond.” Today’s story is about baking in …
Hello and welcome to sourdough and stories beyond.
I am your host Mykola Nevrev.
In each episode of this podcast, I am going to share a story to inspire you to have more empowering experiences in your life.
Today’s story is about the connection between rye flour, Medieval witch hunting and a few other bizarre medieval bread traditions.
Warning, this episode mentions physical violence.
When I first read this story, it impressed me on so many levels, and my first thought was: how lucky we are to live in a time when science and technology makes life so much safer and easier.
From the 14th to the 19th century, planet Earth experienced what’s known as the Little Ice Age, which caused a lot of unpleasant side effects. Cold summers and dramatically cold winters caused famines, scarcity and influenced the life of entire nations. The Climate changed dramatically: before, wheat and grapes were grown in Scotland and Greenland was actually green, but after the ice covered much of the land the border of wheat growing regions moved farther to the south.
During this time, rye proved to be a better choice as it was not as demanding of soil quality and it could produce a harvest even in a colder climate. In many European countries, rye bread was seen as bread for poor people, while rich people ate bread that was white and made of wheat. We don’t see white bread as a luxury product nowadays, but in Medieval Europe life was very different.
Rye was much more reliable, but on the other hand, the grains that grew in the cold and humid climate were a perfect substrate for a group of parasite fungi called ergot and the consumption of rye flour infected with ergot caused an illness called ergotism. Once again, we are lucky to live in a time when you don’t need to worry about dying after eating a slice of rye bread. Ergotism caused hallucinations, convulsions, gangrene and death in some cases, when the intake of infected grains was high. If the rye contained even 1% ergot it caused symptoms and if the infected grain was as high as 7% there was a high mortality rate.
By Dominique Jacquin – Dominique Jacquin, Public Domain, https://commons.wikimedia.org/w/index.php?curid=4436134
Infected rye is responsible for thousands of deaths, with the last reported epidemic in France less than 100 years ago. Swiss chemist Alfred Hofmann synthesized LCD drugs from ergot thanks to its highly hallucinogenic properties.
The Order of Saint Anthony, a religious organization aimed at helping people suffering from ergotism suggested limiting rye bread consumption as a way to prevent illness. But This advice was hard to follow during times of famine. Even when French physician Dr.Thuillier proved that ergot on rye caused ergotism, farmers did not take it seriously.
As toxins from ergon caused severe hallucinations, many historians acknowledge a correlation between the number of which hunting cases and the ergoism epidemic. Because the ergot toxins caused hallucinations and obsessions, people who were living in hush conditions tried to compensate for their difficulties by vying for power. So, They blamed their problems on witchcraft and other magical things. Toxins in the bread they ate only made these obsessive beliefs even stronger, and so thousands of women were tortured to death in addition to all the direct victims of ergotism.
As the Little Ice Age passed and the temperature increased, wheat started to be more widespread again and cases of ergotism decreased, which meant that a lot fewer women were buried alive..
Infected rye bread is claimed to be one of the causes of another grim medieval story: dancing plague. This phenomenon took place in Strasbourg in 1518, when during one summer month, as many as 400 people reportedly danced themselves to death. Similar events happened during the Little Ice age in a few other cities, and to this day, historians still don’t agree on the source of this behavior.
Ergot poisoning and mass hysteria are claimed to be the main reasons. Luckily, this phenomenon has not been documented in Modern times.
I didn”t have any personal encounters with ergot fungi, but earlier this year I spent an hour in the National Museum of Ancient Art in Lisbon, examining the figures of the Hieronymus Bosch painting called The Temptations of Saint Anthony. Of course, I brought my sourdough starter with me to the museum He is a stiff starter named Luigi, and I always travel with him.. The painting was something out of this world, and I was absolutely mesmerized by it. Bosch lived during the most grim time of the Little Ice Age and some authors (like Laurinda S. Dixon) see the ergot poisoning and hallucinations as the main source of Bosch’s unique and grotesque style. So the painting that impressed me so much could really be the result of infected rye bread.
While Eating bread during Medieval times could make you a victim of ergotism or dancing plague, it could also protect you–or even save your life. Shockingly, people made what they saw as protective bread using ingredients like urine or blood.
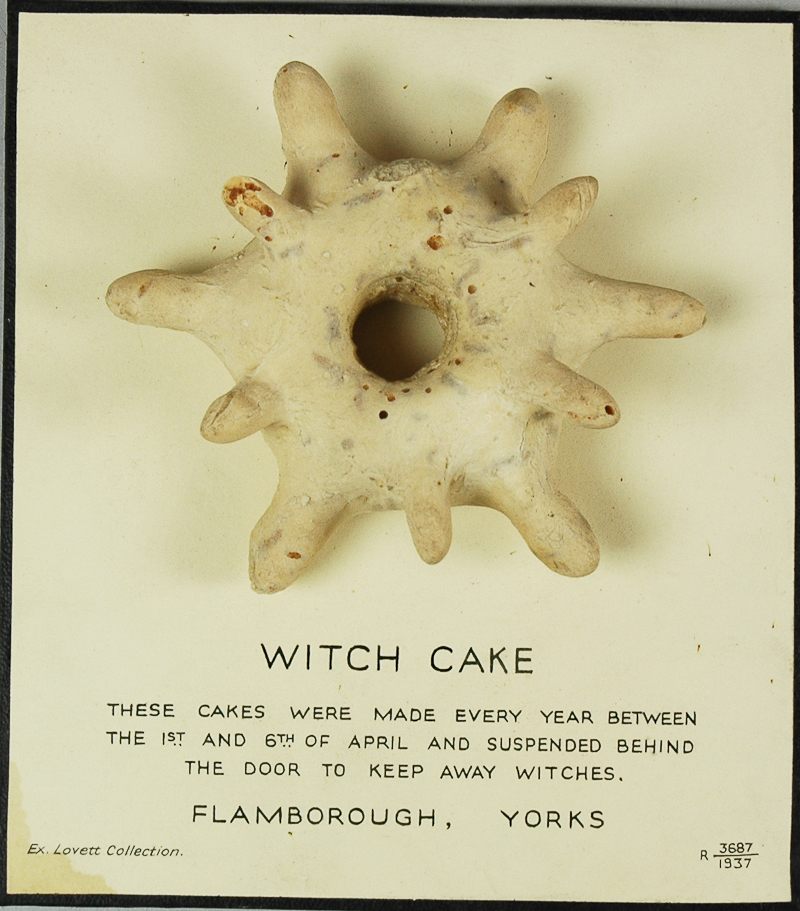
It’s certainly hard for us to imagine why people would do something so disgusting. Perhaps this idea was a product of ergot toxicity, but according to these bakers, this bread was supposed to protect you from witches and witchcraft. An Important note about the ingredients: only girls’ urine was supposed to be used. Only 2 witch cakes still exist and both of them are housed in UK museums. The cakes resemble spiky bagels and were clearly not made to be eaten. Basically, they are just containers for urine.
And if you think that this urine cake is the most bizarre bread recipe around, I have found an even weirder one.
The Medieval period was also known for its vampire stories and as you can imagine, anti vampire bread recipes existed as well in many East European countries. Supposedly, When the grave of a vampire was found, blood was extracted in order to make bread that would protect you from vampires. But in contrast to witches cake, you had to actually eat it to achieve protection.
All these stories now belong to a true Cabinet of Curiosities of baking history, and I feel blessed and privileged that I don’t need to be afraid of rye bread or to make bread with bodily fluids. I also feel sorry for all people who suffered from ergotism and it’s side effects.
This episode was recorded in the beautiful downtown of Bratislava Slovakia.
You can find the text version on my website mykolanevrev.com
Many thanks to Mandy Jones and Pilota Creative for producing this podcast.
I’m looking forward to sharing another story in two weeks. Until then, please don’t add anything unexpected to your bread.
Listen on Spotify Hello and welcome to Sourdough and stories beyond. I’m your host Mykola Nevrev. In each episode of this podcast, I am going to share a story to inspire you to have more empowering experiences in your life. Today’s story is about Nuclear …
Listen on SpotifyHello Welcome to Sourdough and stories beyond. I’m your host Mykola Nevrev. In each episode of this podcast I’m going to share a story to inspire you to have more empowering experiences in your life. Let’s start with a story about Alaskan sourdough. This …
Palyanytsya is one of the symbols of Ukrainian baking. It appears on postage stamps and is an integral part of Ukrainian culinary culture. Traditionally, it has a round shape, like the sun, and a distinctive cut on top that makes the bread look as if it is smiling. Palyanytsya is soft, light, and airy. For me, it tastes best simply with homemade butter and coarse salt.
We baked this bread at Bloom Bakery as part of the Bake for Ukraine project, as well as during many events and pop-ups. Bake your own palianytsya and become part of the project. My thanks to Kateryna Seldonenko for the original recipe.
Ingredients
(for one loaf, approx. 1 kg)
160 g Lievito Madre
50 g whole wheat flour
500 g white wheat flour
310 g water
70 g milk (can be vegan)
50 g butter (clarified is best, but regular butter works as well)
15 g sugar
10 g salt
Method
In the bowl of a stand mixer, combine the Lievito Madre (torn into small pieces), milk, and water. Add the flour and mix on second speed just until all ingredients come together. Cover the bowl and let the dough rest for 45 minutes. Then add the butter, sugar, and salt, and continue mixing on second speed until smooth, about 10 minutes. The finished dough should feel supple and pleasant, not sticky.
Transfer the dough to a lightly oiled container, perform one fold, cover, and allow it to ferment for 3–4 hours. During this time, fold the dough once or twice.
Turn the fermented dough out onto a floured work surface, shape it into a round, and place it into a round proofing basket dusted with starch or coarse flour. Let it proof for 1.5–2 hours at room temperature, or about 8 hours in the refrigerator (not longer, to avoid over-fermentation).
Turn the proofed loaf out onto a board lined with baking paper. Using a razor blade, score the dough at a 45-degree angle to create the characteristic “smile.” Bake with steam on a well-preheated pizza stone: 10 minutes at 250 °C, then 10 minutes at 230 °C, and finish with 20 minutes at 210 °C without steam. If the crust darkens too quickly, lightly spray the loaf with water.
Allow the baked bread to cool completely on a wire rack.
Not long ago, I thought that a highly hydrated spelt bread could only be baked in a tin, otherwise it would spread. But things change, and fortunately, so do my opinions. With new knowledge came a new attempt: a free-standing, high-hydration spelt loaf. And it …
I created this recipe during the COVID period, and since then it has been baked thousands of times by sourdough enthusiasts. It is therefore truly well tested and reliable. The recipe includes a small amount of sugar and butter. Butter can be replaced with any …
I first noticed miso bread in the selection of an English bakery, and I immediately wanted to try it myself. If you don’t have miso at home, I recommend getting some. It has a distinctive aroma and depth of flavor, and it is a natural source of prebiotics, and after baking, postbiotics, which I have written about in one of my articles.
This is a bread that quietly connects fermentation traditions from different cultures.
Traditional notes before you begin
Miso is salty and dense. That is why the first step in the method is to dissolve it thoroughly in water.
Because miso already contains salt, we reduce the amount of salt added to the dough. I started with 5 g and later increased it to 8 g. Taste the dough; 5 g may be just right for you.
I am sharing this recipe during the peak of summer heat. All fermentation times given are indicative only. Always let the dough guide you.
Ingredients
300 g wheat flour T650 (or bread flour)
100 g rye bread flour (or whole rye flour; if using whole rye, add a little more water)
300 g water
150 g Lievito Madre, at peak activity
50 g miso paste (I used brown rice miso)
5–8 g salt
Method
In the bowl of a stand mixer, dissolve the miso paste thoroughly in the water. Add the flours and the Lievito Madre, torn into small pieces. Mix on second speed just until everything is evenly combined. Cover the bowl and let the dough rest for 45 minutes.
Add the salt and continue mixing on second speed for about 7 minutes. The dough should feel very pleasant, neither stiff nor overly soft.
Transfer the dough to a lightly oiled container, cover, and allow it to ferment for about 3 hours. During this time, fold the dough twice with wet hands. The dough will visibly increase in volume and show signs of fermentation in the form of bubbles.
Turn the partially fermented dough out onto a floured surface, shape it, and place it into a proofing basket dusted with starch or coarse flour. Allow it to proof for 2–3 hours at room temperature, or overnight in the refrigerator.
Bake the miso bread in the classic way: with steam on a preheated pizza stone, or in a covered baking vessel. Bake for 20 minutes at 250 °C, then finish with another 20 minutes at 210 °C without steam or lid. Both the stone and the vessel should be thoroughly preheated to allow the loaf to expand fully. Let the baked bread cool completely on a wire rack.